
Release notes - April 8, 2025
On this page
- Payments
- Core Product
- Memberships
- Core Product
- Appointment Book
- Web POS (Point of Sale)
- Reports
- Online Booking
- Fitness
- Product Edition
- Marketing
- Zenoti Mobile
We’ve enhanced the structure of our release notes to better serve your needs. Updates are now categorized under clear headings based on Add-ons, Core Product, Product Edition, Personas, and Modules.
Payments
We are introducing an enhanced Tips Payout Program designed to facilitate same-day tips payout. We have done this for speed, flexibility, and convenience. With an improved onboarding experience and new features, this program makes tip access smoother.
- New enrollments to the improved Tips Payout program are now open.
- Existing users will start transitioning automatically in April 2025 with upgrade prompts.
How the new Tips Payout Program is Better
- No prefunding required—same-day payouts now available through a simplified fund flow.
- Employees can use their myZen Smart Card to access tips, build credit, and even earn rewards.
Stay tuned for your upgrade notification and enjoy a smarter, faster way for your employees to access their earnings!
Core Product
This includes foundational features and tools that are essential for running day-to-day business operations. These features cover appointments, POS, employee management, inventory, reporting. They are designed to provide a consistent experience for users across all industries Zenoti serves.
Memberships
Business Owners/Center Managers
Businesses can now keep unpaid invoices open when canceling memberships. This helps centers to collect pending payments without reinstating canceled memberships. Payments apply only to the outstanding balance. Businesses can recover revenue while keeping records accurate.
Consider a center offering a monthly membership program with automatic billing. Previously, when memberships were canceled, any pending invoices were voided, resulting in potential revenue loss. Now, the center can retain these invoices for collection, ensuring that payments are processed without reinstating the canceled membership.
Note: This feature is not enabled by default. Reach out to your administrator to enable this feature.
How to Use:
- At the organization level, access Configurations.
- Navigate to Memberships > Membership Actions > Cancellation Rules.
- Switch on the Unpaid dunning invoices remain open after cancellation toggle.
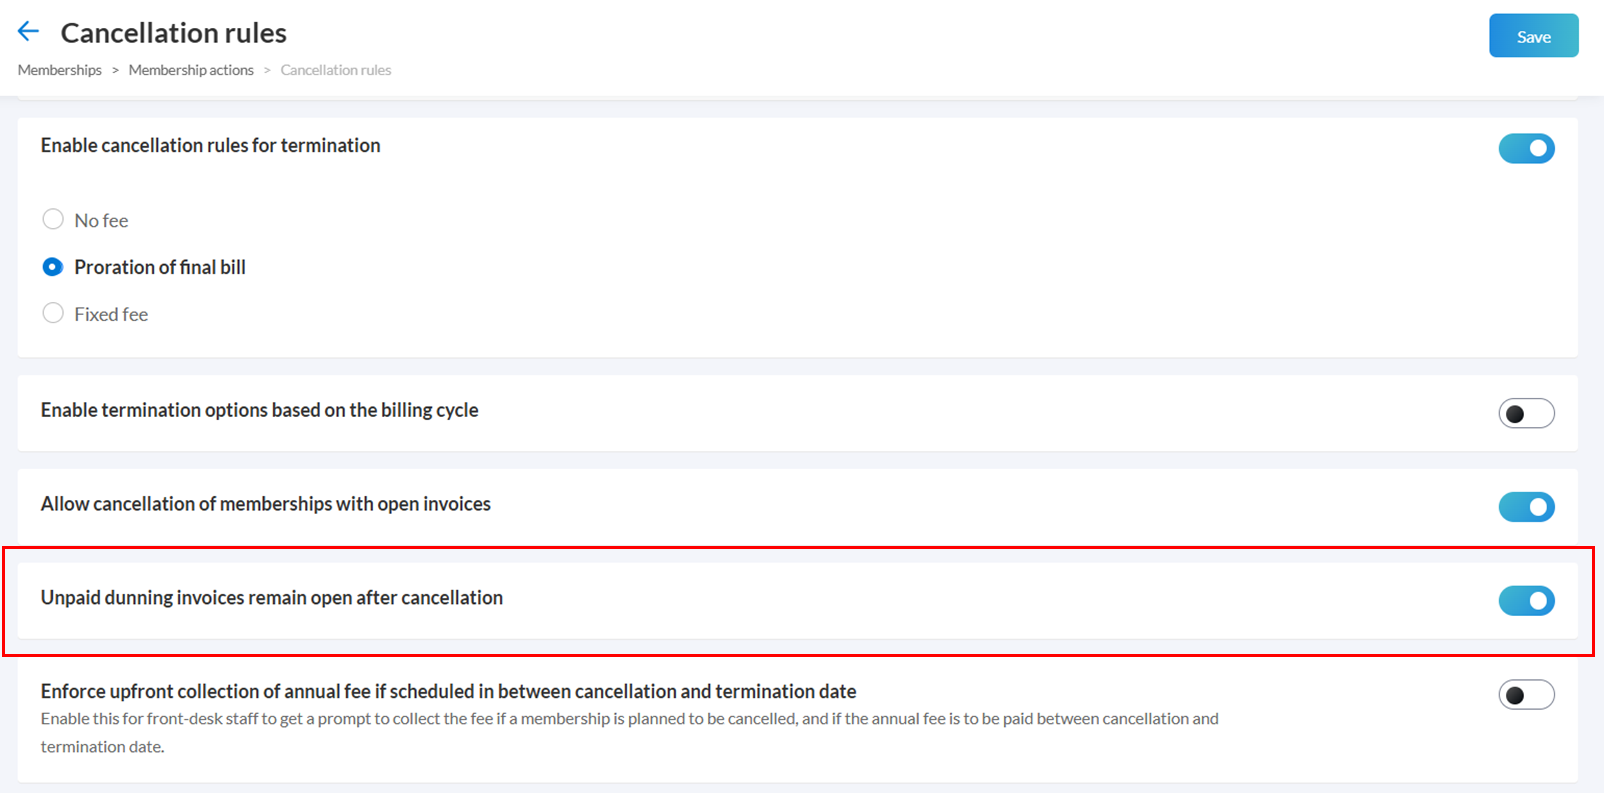 4. Click Save.
Learn More: For detailed instructions and further context, refer to the Unpaid dunning invoices remain open after cancellation article.
Core Product
This includes foundational features and tools that are essential for running day-to-day business operations. These features cover appointments, POS, employee management, inventory, reporting. They are designed to provide a consistent experience for users across all industries Zenoti serves.
Appointment Book
Administrators, Front Desk Operators/Service Providers
The redesigned appointment book now features updated icons along with an improved list view that supports faster navigation and cleaner visuals. The enhancements include updated icons for improved visual clarity, a new Status filter for simplified appointment filtering, and updated color palettes for a more modern interface.
Note: The updated icons appear only when the Modern theme is selected.
Learn more: For more information, refer to the Redesigned appointment book article.
Administrators, Business Owners/Center Manager
To help businesses avoid loss of revenue from high-value add-ons, you can now apply cancellation and no-show fees directly to add-on services. Previously, these fees could be applied only to primary services.
With this enhancement, two new options Allow cancellation fee and Allow no-show fee are available in the General tab of the service setup screen. When enabled, Zenoti will apply the same cancellation fees to add-ons as it does to primary services.
A spa offers a Swedish massage session priced at $100, with a 30-minute add-on priced at $25. When a guest cancels or does not show up, only the base service was previously subject to cancellation or no-show fees. As a result, the spa lost revenue from the $25 add-on, even though time and resources were allocated for it.
With this update, the spa can now enable cancellation and no-show fees for the add-on. If a guest fails to show up or cancels their booking, the no-show fee or the cancellation fee are charged for both the main service and the add-on. This ensures that the business does not incur a revenue loss for premium add-ons.
How to use:
- At the organization level, click Master Data.
- Click Services.
- Create an add-on service or select the add-on service you want to edit.
- From the General tab, select the Allow cancellation fee and Allow no-show fee checkboxes.
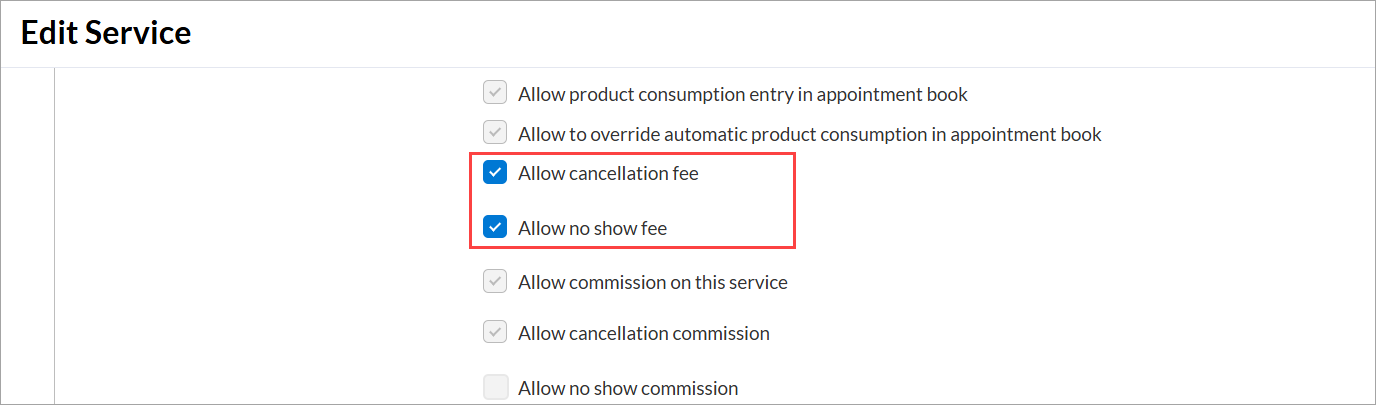 5. Click Save.
Learn more: For more information, refer to the Edit services article.
Web POS
Administrators, Front Desk Operator/Service Provider
Previously, front desk operators had to manually select employees and calculate commission percentages for each sale, making the process time-consuming and error prone. The automatic split commissions feature is introduced to automatically divide commissions equally among multiple employees involved in a sale—whether it’s for products, memberships, packages, gift cards, or prepaid cards.
A new Split commission equally checkbox appears in the Multiple Employee Commissions screen.
- If the Enable auto split for commissions by default toggle is enabled, the Split commission equally checkbox is selected by default.
- If the Enable auto split for commissions by default toggle is disabled, the Split commission equally checkbox will still appear, but it will be cleared by default, allowing for manual entry.
Note: This does not include splitting commissions for the sale of services and day packages.
A guest visits the salon for two services, a haircut by Rachel and a color service by Luis. During the appointment, both stylists recommend a smoothing serum, which the guest decides to purchase at checkout.
With auto-split commissions enabled, Zenoti will automatically divide the product commission equally between Rachel and Luis, but only if both employees are listed in the Multiple Employee Commissions screen and the Split commission equally checkbox is selected.
How to Use:
- At the organization level, click Configuration.
- Navigate to POS > Commission gains.
- Switch on the Enable auto split for commissions by default toggle.
- Click Save.
Learn more: For more information, refer to the Commission gains article.
Reports
Business Owners/Center Managers
As a business owner, when you previously filtered the Sales Accrual report by business unit, records that were not assigned a business unit were excluded. With this enhancement, you can now include records that are not assigned to any business unit by selecting the Not Specified checkbox in the Business Unit filter.
This update ensures that your filtered Sales Accrual report captures all relevant records even those without a specific business unit tag. If you are using multiple filters or analyzing data by unit, you will get a complete and accurate view, helping you make data-driven decisions.
How to use:
- At the organization or center level, click Reports.
- Navigate to Finance and click Sales Accrual.
- From the Business Unit filter drop-down, select Not Specified.
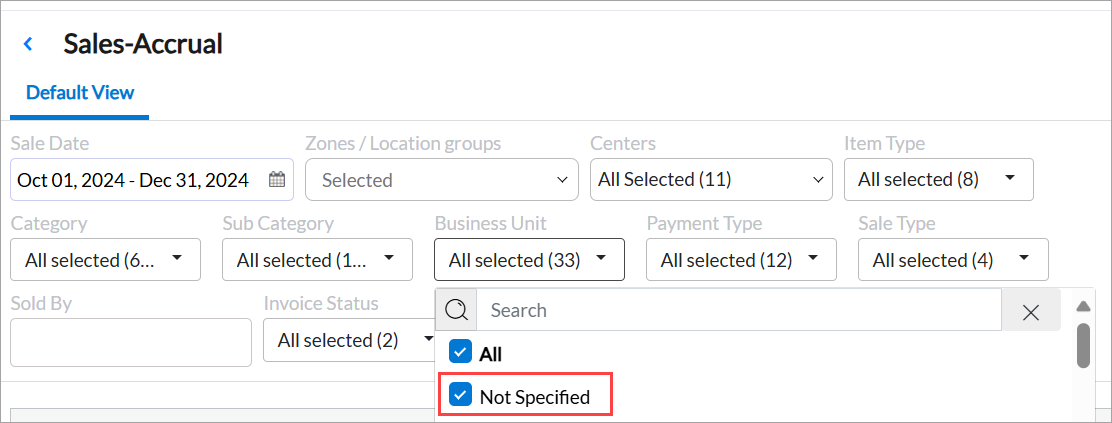 4. Click Refresh.
Learn more: For more information, refer to the Sales Accrual article.
Online Booking
Administrators
Businesses can now set a minimum time between when a guest purchases an online gift card and when it becomes active. By introducing such a delay in activation, both businesses and guests are protected from potential fraud.
By introducing a short delay of up to 10 days, it gives banks and cardholders time to recognize and report unauthorized activity. This helps businesses block fraudulent gift card redemptions before they happen.
How to use:
- At the organization level, click Configuration.
- Navigate to Online Booking > Online booking settings > CX V3.
- In the Common settings for Webstore and CMA (Customer Mobile App) section, navigate to Gift cards.
- In the Gift Card Activation Delay (Days) field, enter the number of days you wish to set as the activation delay.
For example: Assume you set the delay to 2 days. This means that if a guest purchased a gift card on March 1, it will be activated on March 3. You can set a delay of a maximum of 10 days. 5. In the Delayed Activation Explanation field, add the message that will appear on the email confirmation and Webstore/CMA.
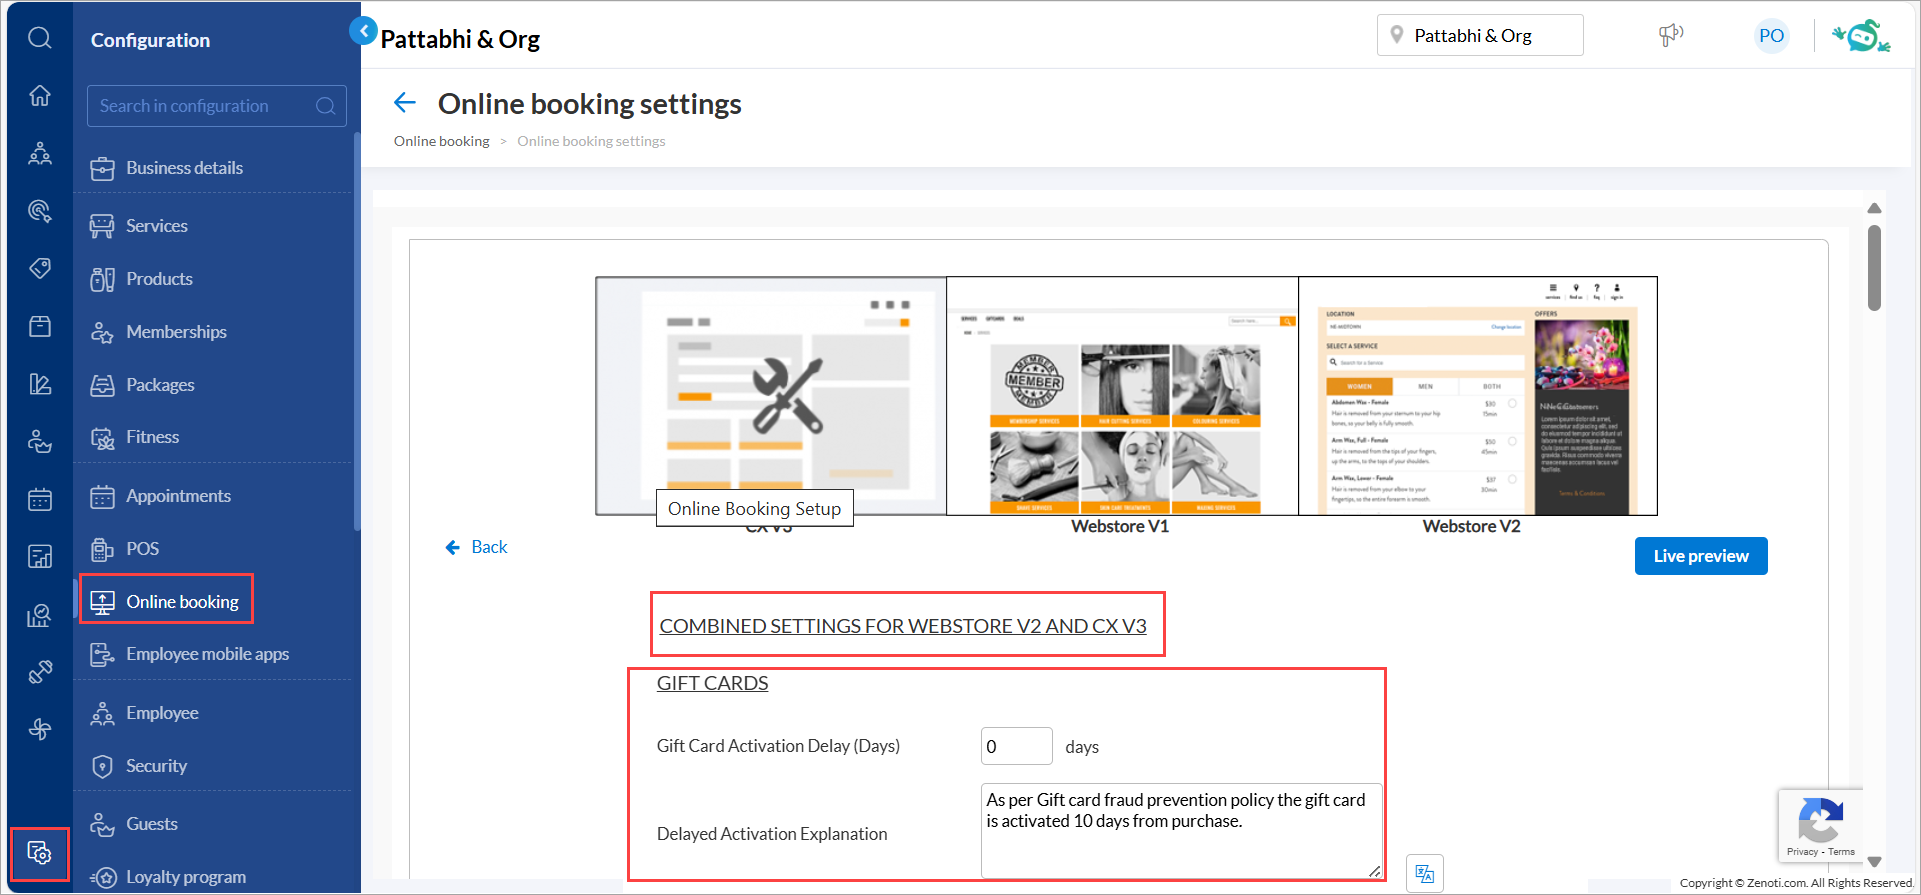 6. Click Publish.
Note: Ensure the activation delay does not exceed or match the gift card's overall validity period at either the organization or center level.
Learn more: For more information, refer to the Set Activation Delays to Reduce Fraudulent Redemptions article.
Fitness
Business Managers
We’ve updated the Classes Visits report to make it more comprehensive and intuitive. Along with renaming it to Center - Visits, we’ve added new features to help you better analyze and track check-ins across all your centers. The report emphasizes data related to all check-ins across centers. The Check-In Type column is now included in all exports and saved views, ensuring consistent reporting.
- New Column: Introducing a new column called Check-In Type that identifies whether check-in is for a Member or via a Guest Pass.
- New Filter: The Check-In Type filter enables you to segregate and view only member check-ins, guest pass check-ins, or both.
How to Use:
- Click the Reports icon from the main menu.
- Search for Center – Visits using the search box on the Reports Dashboard page.
- Click the Center – Visits option to access the report.
- Select the desired filters as per your requirements.
- Click Refresh to view the latest data.
Learn More: For detailed instructions and further context, refer to the Center - Visits report article.
Product Edition
Enhanced versions of the core product customized to meet the specific needs of different businesses. These editions include advanced tools like analytics, benchmarks, marketing, and integrations to optimize operations, track performance, and drive growth.
Marketing
Business Owners, Marketing Teams
To comply with the new FCC regulations effective April 2025, Zenoti now automatically applies expanded opt-out rules to all text (SMS) messages. When a guest replies with an opt-out keyword to a transactional message, they’ll stop receiving both transactional and marketing texts—no extra steps needed.
You can also send a confirmation message with a simple way to opt back in to only transactional messages. However, this message is off by default.
Note: The opt-out behavior for marketing messages remains unchanged: when a guest opts out, they will stop receiving only marketing messages, while other types of communication will continue.
How to use:
To enable and set up the template message for this confirmatory text:
- At the organization level, navigate to Configuration > Notifications > Template for email and text.
- Under Customer Opt-in templates, click Edit against the SMS Opt out confirmation message template.
- Toggle Text to Yes.
- Use the Text Message field and Available Macros to customize the confirmatory text that your guests will receive.
- Click Save.
This feature is enabled by default for businesses in the US.
Learn more: For more information, refer to Configure Opt-Out Confirmation for Transactional Messages.
Zenoti Mobile
Front Desk Operators, Service Providers
Businesses can now efficiently request substitutions when there are changes to scheduled classes. This feature simplifies managing instructor availability and ensuring class continuity.
If a fitness studio hosts multiple daily classes and an instructor cancels, front desk operators previously had to manually contact other instructors to find a replacement. Using this substitution process, instructors can submit a request, notifying all eligible instructors instantly. The first available and willing instructor can accept the request, ensuring class continuity and maintaining reliability.
How to Use:
- From the main menu, tap Classesto view scheduled sessions.
- Tap the icon at the top right corner to see an overview of substitution requests.
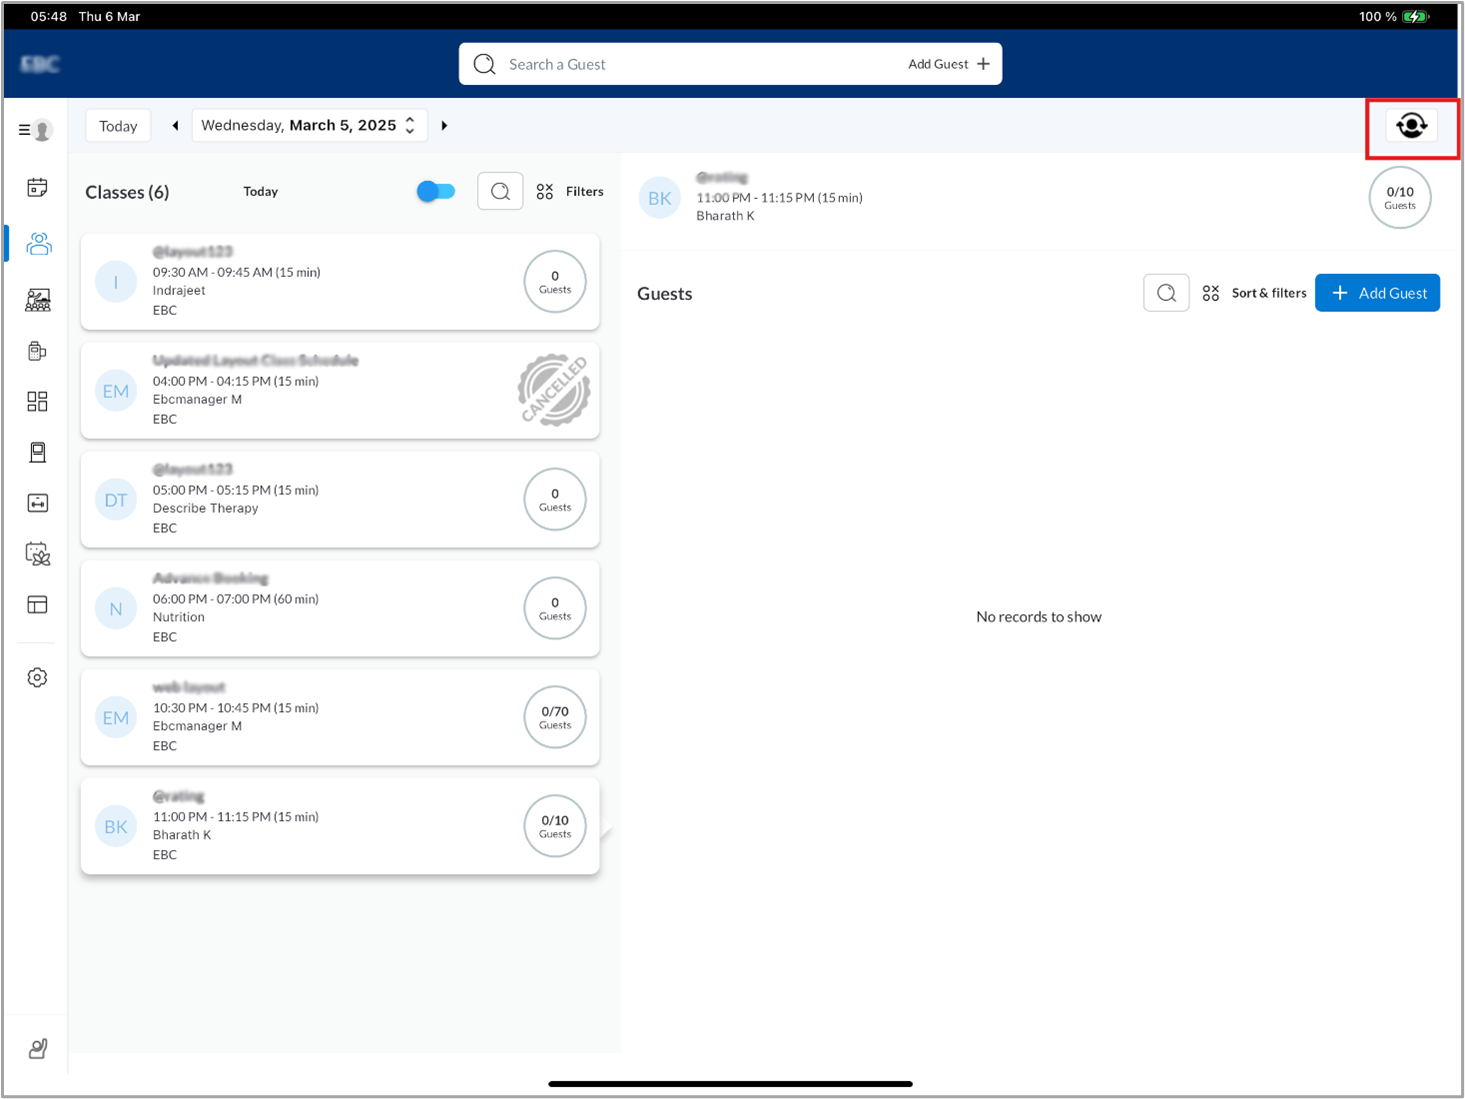 3. View available instructor shifts, review requests, and take action to request a substitute or accept/reject requests.
4. Filter classes based on Timeand Instructorto quickly identify substitution options.
5. Tap Request a Substitute.
Pending requests, cancelled requests and instructors available for substitution are displayed. 6. Tap Requestagainst an instructor to send a request. 7. To withdraw a request, tap Pending, then tap Canceland Confirmthe action.
This feature is enabled by default.
Learn more: For more information, refer to the Request substitute on instructor app article.
| Glossary | April 08, 2025 | A few key terms related to the new features introduced in this release have been added. |