
Release notes - November 4, 2025
On this page
- HyperConnect
- Admin
- Core Product
- Appointments
- Admin
- Reports
- Integrations
- Packages
- Add-On Product
- Payments
- Online Booking
We’ve enhanced the structure of our release notes to better serve your needs. Updates are now categorized under clear headings based on Add-ons, Core Product, Product Edition, Personas, and Modules.
The following table provides a consolidated list of new features, announcements, and updates included in this release. Use this section to quickly scan all major changes before exploring detailed descriptions in the following sections.
HyperConnect
Guests now enjoy greater flexibility when booking multiple services in a single appointment with SmartBot. This update removes the hassle of coordinating providers, especially when different services need different specialists.
Let’s say a guest wants a manicure and a pedicure but prefers two different providers. Previously, this meant booking separate appointments or needing help from the front desk. Now, SmartBot handles it all automatically in one smooth, guided interaction.
With this enhancement, guests can:
- Choose different providers for each service within the same appointment
- Receive a clear summary showing which provider is assigned to each service
How SmartBot works in this scenario:
- When a guest requests multiple services, SmartBot asks if they would like the same or different providers.
- If they choose “multiple providers,” the bot guides them to select a provider for each service.
- SmartBot then books all services together in one appointment.
- The guest receives a final summary, showing each service alongside its selected provider.
Administrators
Businesses using HyperConnect with Twilio phone numbers can now mask each center’s phone number with a unified contact center number. Regardless of which center places a call, guests will see the same branded number, ensuring a consistent and professional communication experience.
If your business runs five centers but manages guest communication through a central contact center, each outgoing call from different centers could show a different number. With this update, you can display a single branded contact number on all outgoing calls, no matter which center initiates them.
How it helps
- Ensures a consistent brand presence across guest communications.
- Prevents confusion caused by multiple phone numbers.
- Gives guests a reliable number they can save and recognize easily.
Configure number masking
- Launch HyperConnect.
- Click the Settings icon in the top-right corner.
- Navigate to the Voice tab.
- Turn on the toggle labeled Enable the Call Masking feature.
- In the Display Number field, enter the number you want guests to see (for example, your contact center or head office number).
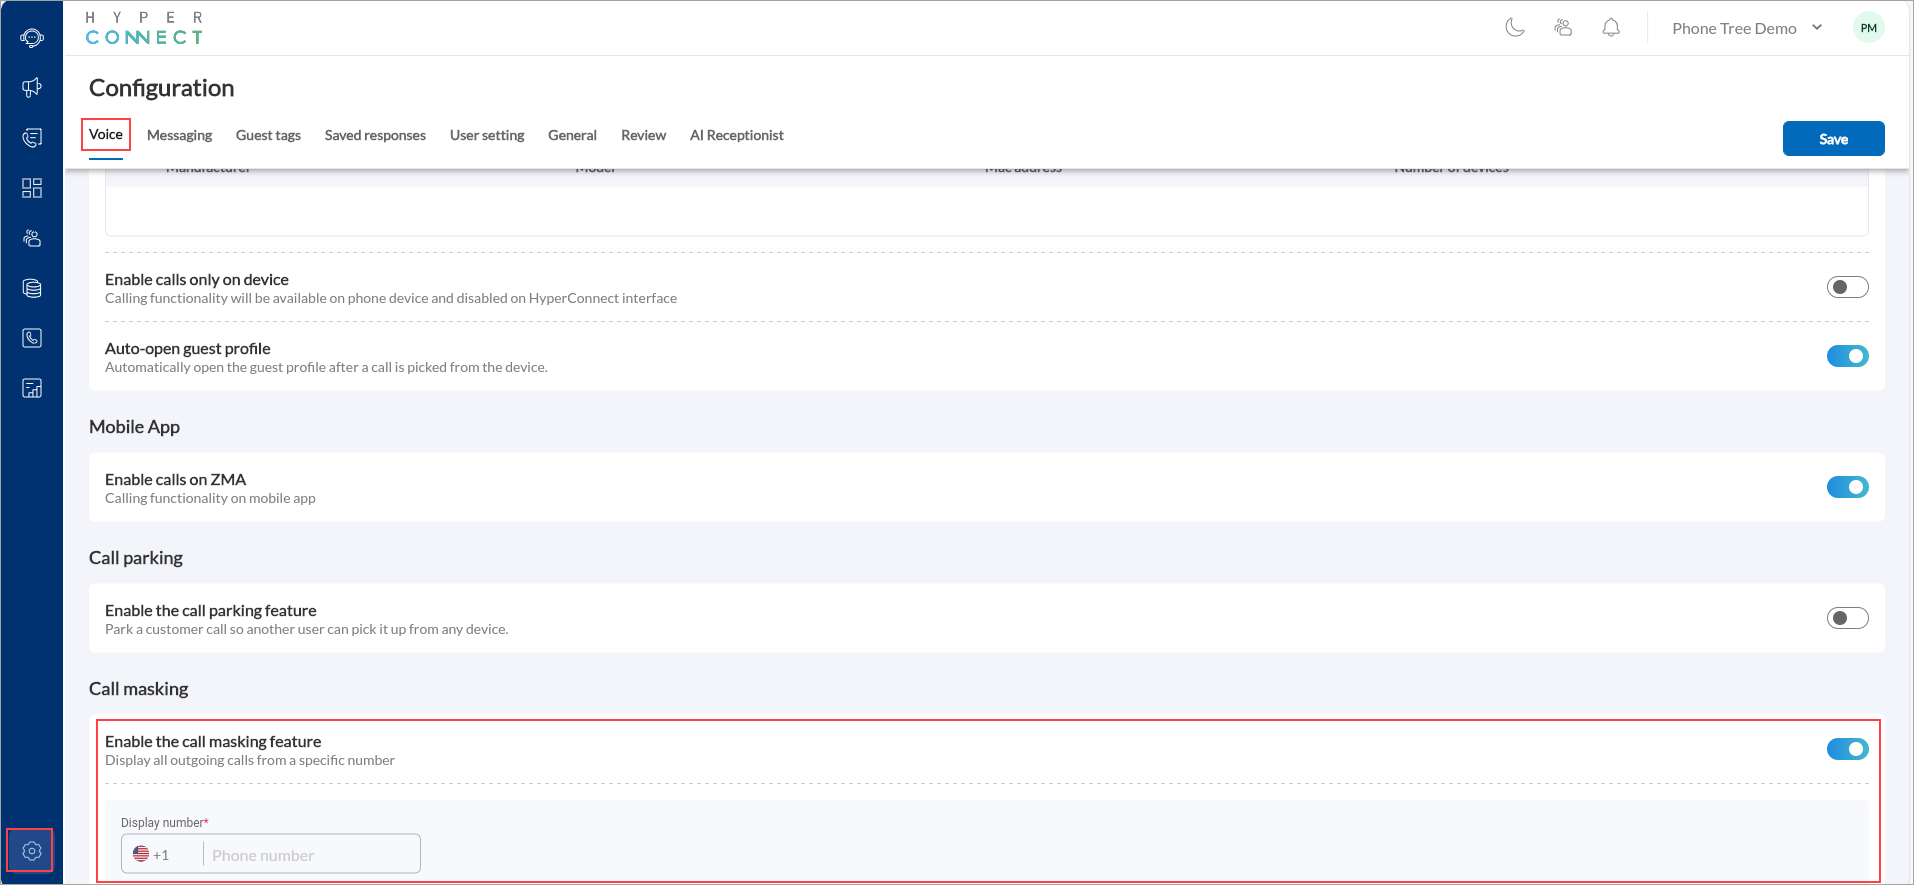 6. Click Save to apply the changes.
Note
- Only Twilio numbers on HyperConnect are supported.
- External phone numbers or numbers outside our network are not supported.
Once configured, the guest will see the masked number (Example: 2469) even if the call was made from another number (Example: 2345)
Learn more: For more information, refer to the Mask Phone Number with Centralized Contact Number article.
Administrators, Front Desk Operators
With Call Parking, your front-desk and support teams can now handle high volumes of inbound calls more efficiently without ever sending a guest to voicemail.
This feature allows team members to park calls in virtual slots, making them accessible to other authorized staff on any Zenoti Voice-enabled device. This reduces wait time, boosts professionalism, and keeps operations flowing smoothly.
Note: Devices must be rebooted after enabling the call parking feature.
How to configure
- Launch HyperConnect.
- Click the Settings icon.
- From the Voice tab, switch on the Enable the call parking feature toggle.
- Enter the minimum call park time in seconds.
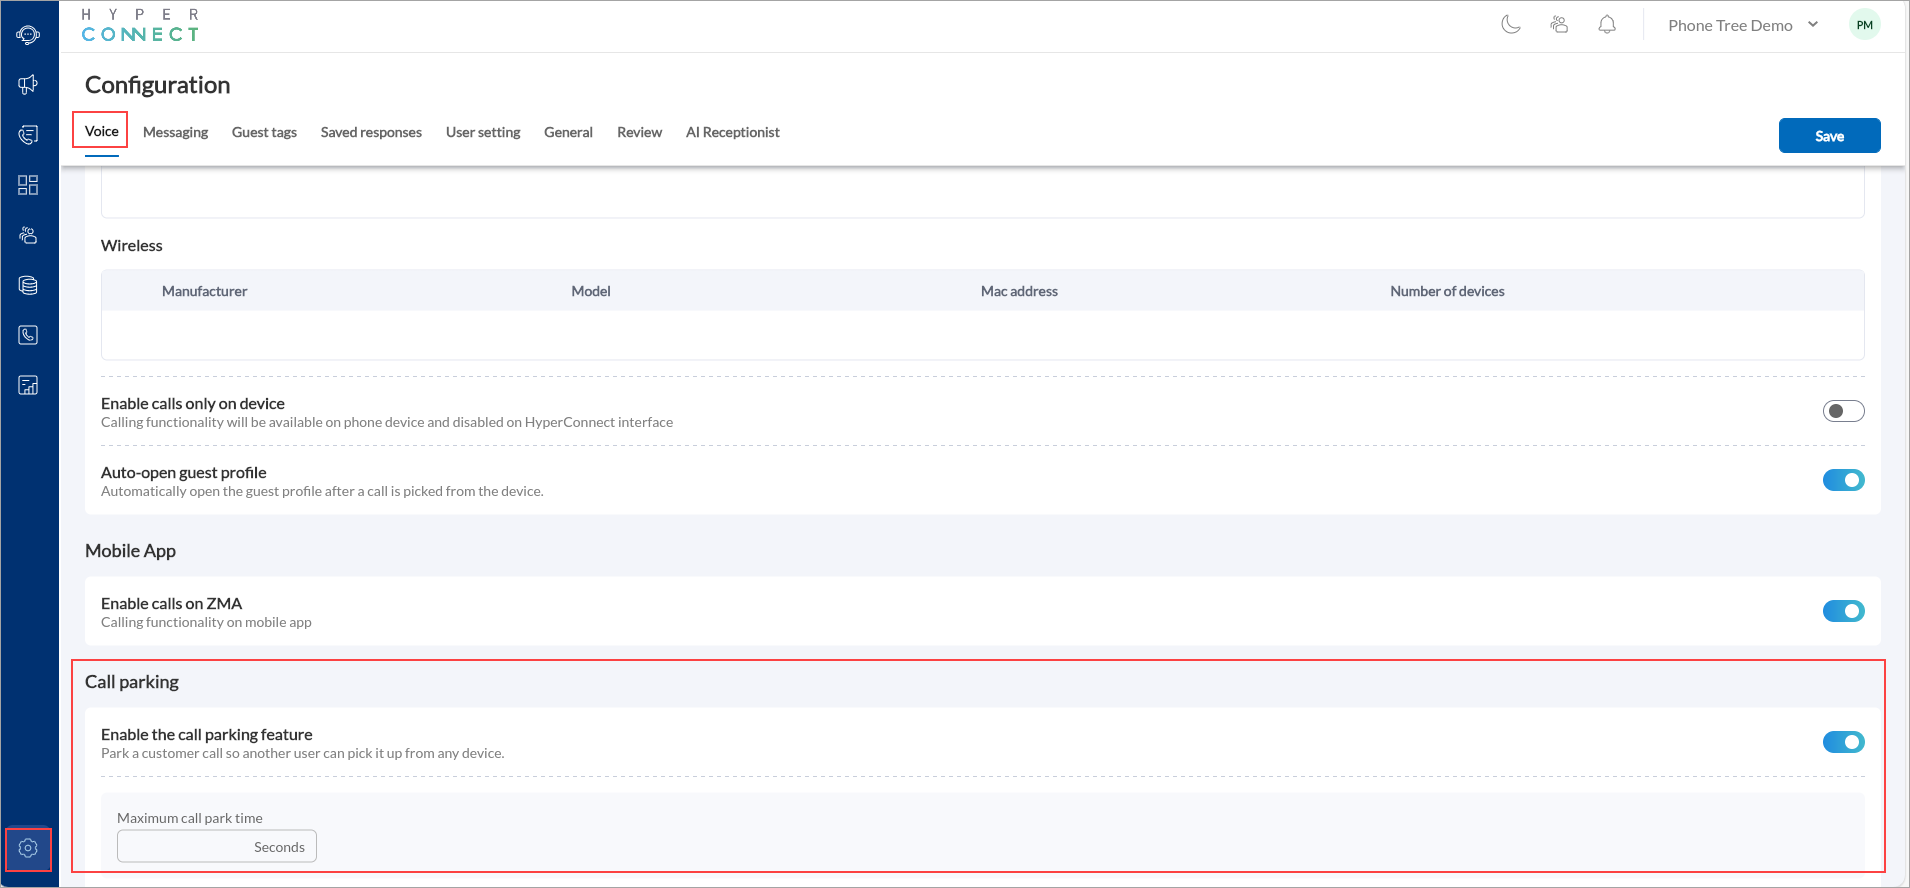 5. Click Save.
Note: Only one call can be parked per slot. The number of concurrent parked calls depends on how many slots you have configured.
Learn more: For more information, refer to the Call Parking in HyperConnectarticle.
Administrators, Front Desk Operators
You can now configure and manage Call Queues in HyperConnect to efficiently handle high call volumes and deliver a consistent guest experience.
When all agents are busy, incoming callers are placed in a virtual queue, eliminating busy tones or abrupt call redirections. Callers stay in line and are connected as soon as an agent becomes available.
How to configure
Set up call queues within your Phone Tree flow
Launch HyperConnect.
Go to Voice > Phone Tree Flows > Manage.
Open or create a phone tree.
Add and configure the queue node
Give your queue a recognizable name (Example: Front Desk Queue).
Upload a hold music file in.mp3 format (up to 10MB).
Choose how queued calls are assigned to agents, either allow the agent to choose who the next caller will be, or Automatically assign to available agents.
Define which employees will respond to queued calls.
Specify how long a caller can wait in the queue (in seconds).
Set the maximum number of callers allowed in the queue at one time.
Define how long each agent’s device will ring before the system moves to the next agent (Example: 10 seconds).
Enable the toggle to record calls for training or quality purposes.
Use the Transitions tab to define what happens after specific call outcomes.
Learn more: For more information, refer to the Queue Incoming Calls in HyperConnect article.
Administrators, Business Owners
We have expanded the number of centers you can associate with a single call center from 20 to 30. This gives multi-location businesses greater flexibility to centralize communication and manage guest interactions more efficiently.
You can use a single business number across multiple locations, even if integrated booking results are not required. In such cases, this configuration helps you maintain consistent guest communication via voice alone.
However, if you are grouping multiple centers as part of one contact center setup for centralized guest management (with or without booking integration), the maximum number of supported centers is 30.
How to configure
- Launch HyperConnect.
- Click the Settings icon.
- Navigate to the General tab > Centers for call centers.
- From the dropdown list, add up to 30 centers that you wish to associate with the call center.
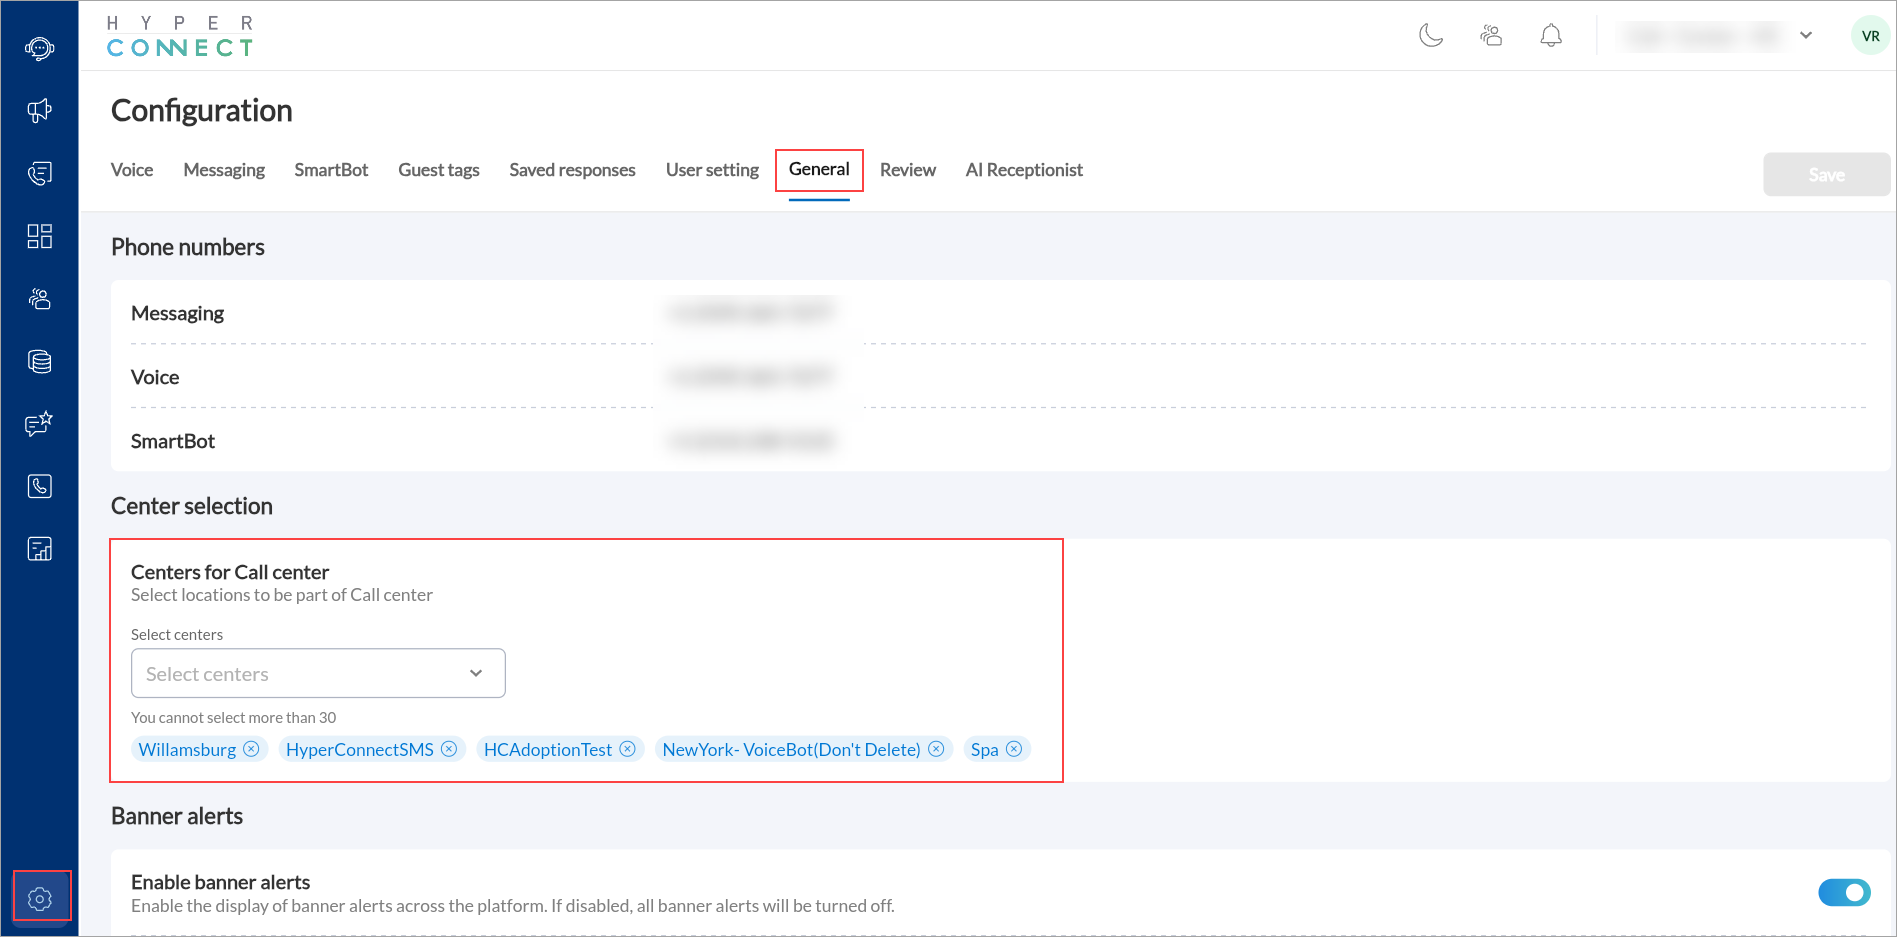 5. Click Save.
Learn more: For more information, refer to Configure Call Center Capacity article.
Administrators, Front Desk Operators
You can now access a dialpad during ongoing calls made through HyperConnect’s softphone. This makes it easier to interact with phone systems that require number inputs during a call.
For example: Your front-desk staff or call center team is reaching out to a third-party booking agency or insurance provider. The call is answered by an IVR asking to "Press 1 for reservations" or "Press 3 to speak to an agent." With the in-call dialpad, the staff can enter the required option instantly, keeping the workflow smooth and professional.
- Launch an outgoing call using the HyperConnect softphone.
- When the call connects, click the Dialpad icon on the call screen.
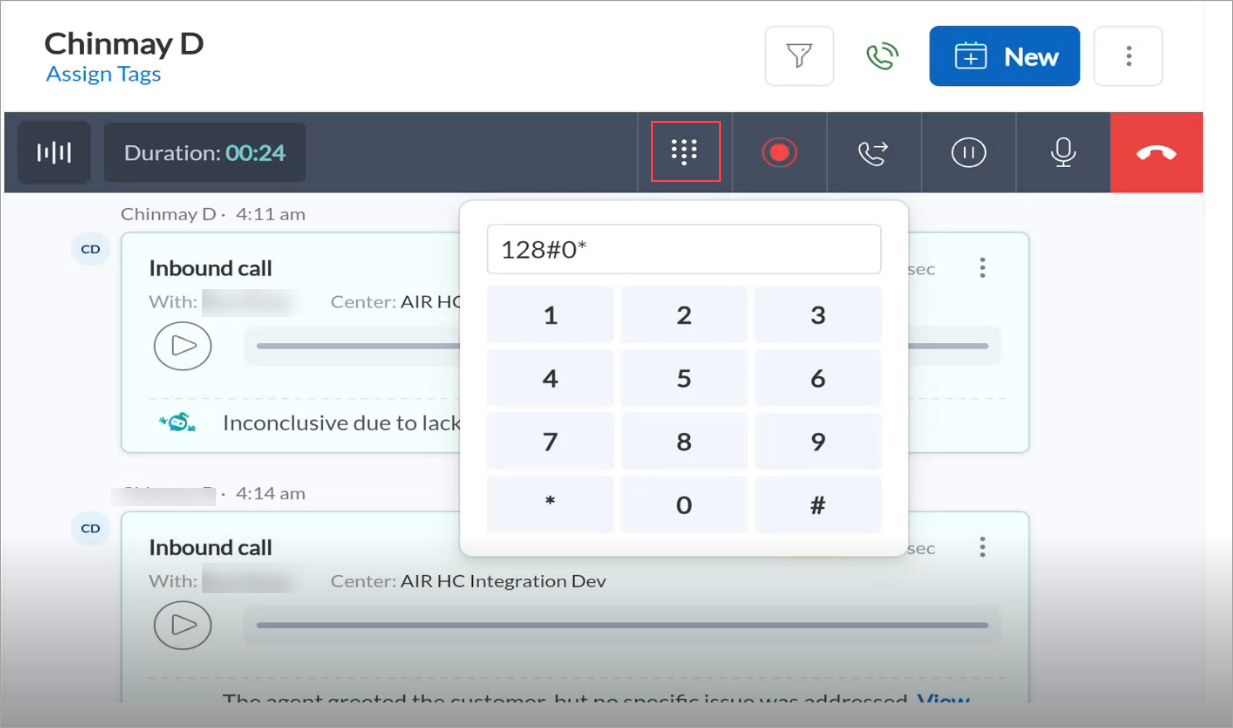 3. Use the keypad to respond to prompts or navigate IVR menus
Administrators, Front Desk Operators
You can now distribute incoming call volume more efficiently with agent utilization–based call routing or Round robin routing in HyperConnect. This prevents overload on specific staff members and improving overall response quality.
Imagine a busy salon or spa that receives dozens of calls every day. With a fixed call order, one team member often ends up taking the majority of the calls, leading to burnout, slower response times, and inconsistencies in guest support. With Round Robin routing, HyperConnect rotates calls based on agent utilization, ensuring every staff member receives a fair share of incoming calls. As a result, your team stays focused, guests receive faster assistance, and operations run more smoothly.
Benefits
- Evenly distribute calls across active agents
- Reduce wait times and improve guest satisfaction
- Increase team productivity with balanced workloads
How to configure
- Launch HyperConnect.
- Click Settings.
- In the Voice tab, navigate to Business hours configuration > Routing options.
- Choose the preferred routing method as Round robin.
- Click Save.
Learn more: For more information, refer to the Call Routing article.
We are excited to introduce organization- level Analytics in HyperConnect, giving you a consolidated view of performance across all your locations from a single dashboard. Until now, our analytics were available at the individual center level. With this update, you can now switch to the organization level from the location selector to view aggregated data and insights that span your entire organization.
Key highlights:
- Unified Performance View: See active locations, average Google ratings, SmartBot revenue, and flagged calls across all centers.
- Leaderboard Insights: Identify top-performing and underperforming locations by Google Rating, SmartBot Revenue, or Flagged Calls.
- Consolidated Call Analytics: Track organization-wide call volume trends and category distribution.
- Email Reports: Receive weekly or monthly performance summaries at both organization and location levels.
How to use
- Launch HyperConnect and navigate to the location selector at the top-right corner.
- Choose Organization Level.
- Click the Analytics icon in the left panel.
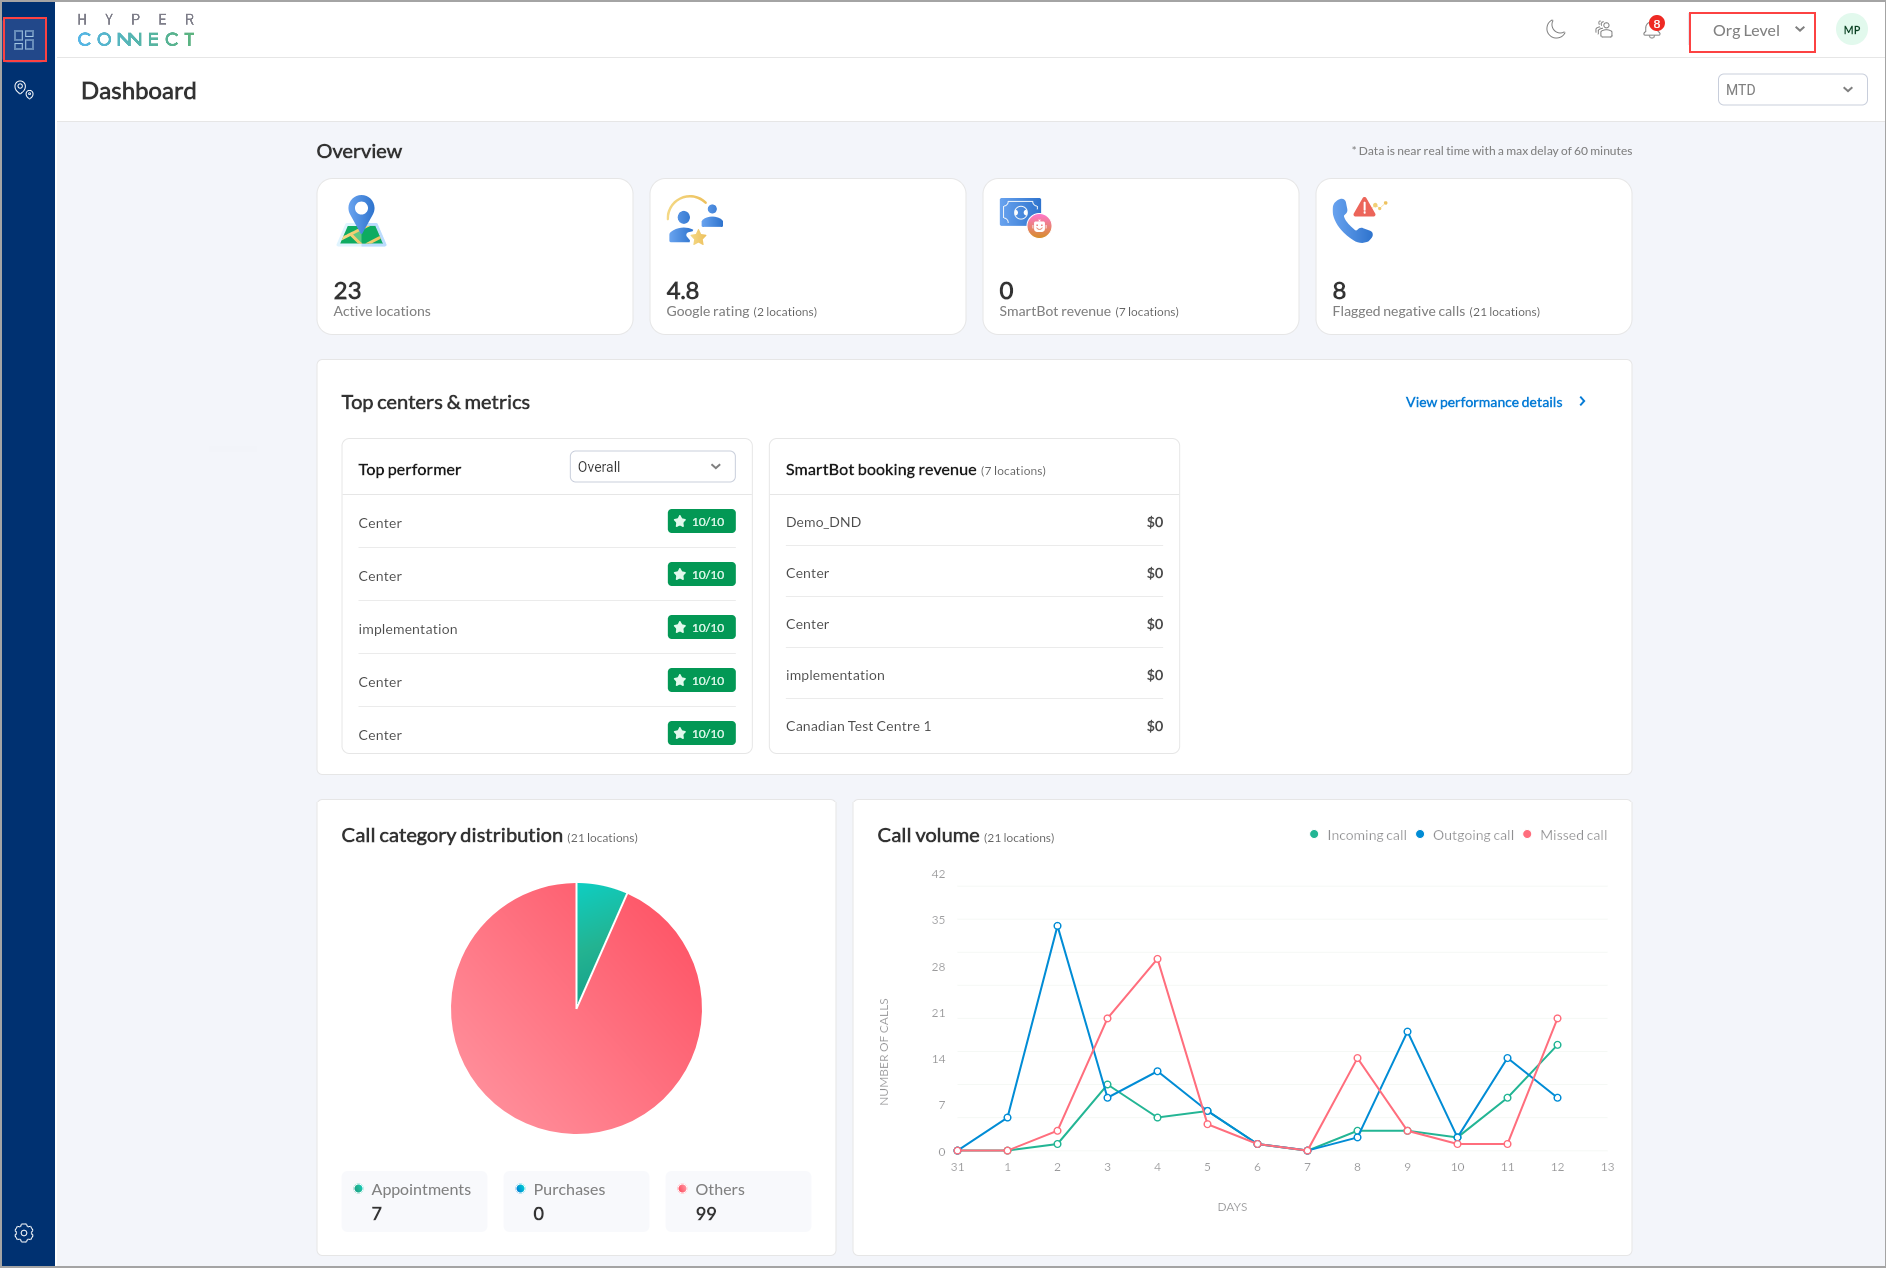 4. Explore key metrics, performance leaderboards, and call analytics.
5. Use filters to view data by metric type, such as Google Rating, SmartBot Revenue, or Flagged Calls.
6. Click View Performance Details for deeper insights.
Optionally, you can configure Email Reports under settings to receive organization and location-level summaries weekly or monthly.
Learn more: For more information, refer to the Organization Level Analytics in HyperConnect article.
Admin
The guest listings page has been enhanced for faster data management and improved visibility of guest information.
What’s New?
- New filters: Quickly narrow results by center, guest category, and active memberships, packages, or gift Cards.
- Grid updates: Added email and profile completeness columns. Membership now shows active/inactive status and more.
- Visual cues: Missing or invalid contact details are flagged with icons and tooltips for correction.
- AI summary: Access guest insights instantly through the new AI Summary button.
Core Product
Appointments
Front Desk Operators, Administrators
The redesigned appointment filters make it faster and easier for users to locate the exact set of appointments they need by category, sub-category, or service type. Now, there is no need to toggle between multiple views. The enhanced filtering improves visibility, saves time, and provides greater control over how appointments are displayed.
Note: These filters are only available on the web version of the Appointment Book.
Business Scenario: Front desk staff and service providers can now easily find specific appointments using new multi-select, searchable filters by appointment or service category/sub-category. The Appointment Book updates instantly to show matching results, improving efficiency and reducing booking errors.
The previous toggle between status and category views is discontinued. Instead, users can:
- Set the appointment block color to reflect either status or category.
- Display the status or category at the bottom of the block.
These updates make it easier to view all relevant appointment details without switching between views.
How to Use:
- Open the Appointment Book on web.
- Click Filters and select one or more appointment or service categories/sub-categories.
- Use Search to quickly find categories.
- Click All to include every category or Reset to clear all filters.
Admin
Front Desk Operators, Administrators
Export controls in Zenoti strengthen the protection of guest and employee data by introducing permissions, limits, and Multi-Factor Authentication (MFA) for reports containing Personally Identifiable Information (PII). These measures ensure that sensitive data is accessed only by authorized users, exports remain secure, and all actions are fully auditable.
Business Scenario: Export controls now apply to all reports containing PII. This ensures sensitive data is handled securely and only by users with the right permissions.
- Owners and zonal managers have full export rights with MFA.
- Admins and managers can export up to 5,000 rows by default (limits can be adjusted by owners).
- Other roles are blocked from exporting PII unless explicitly enabled.
When exports exceed the configured limits, the request is routed for approval. Once approved, the requester receives a secure download link. All export actions and configuration changes are logged in the Employee Activity Report, including:
- who exported the data
- what data was exported
- record counts and timestamps
- MFA verification details
- approval information
These enhancements give centers more control over data exports, protect guest and employee privacy, and maintain transparency with detailed audit trails.
Learn More: For more information, refer to the Controlled Export Framework for PIIarticle.
Reports
Business Owners, Center Managers
The Definitions slider in reports now displays only the columns currently enabled in your saved view. This update enhances clarity by removing hidden columns and aligning the slider’s layout with what you actually see in the report.
The column order in the slider also mirrors the left-to-right layout of your report, but only after the view is saved. If you switch views, the column order changes accordingly. This ensures consistency and reduces confusion when rearranging columns.
How-to use:
- At the organization or center level, click Reports.
- Click to open the report of your choice.
- Click Definitions.
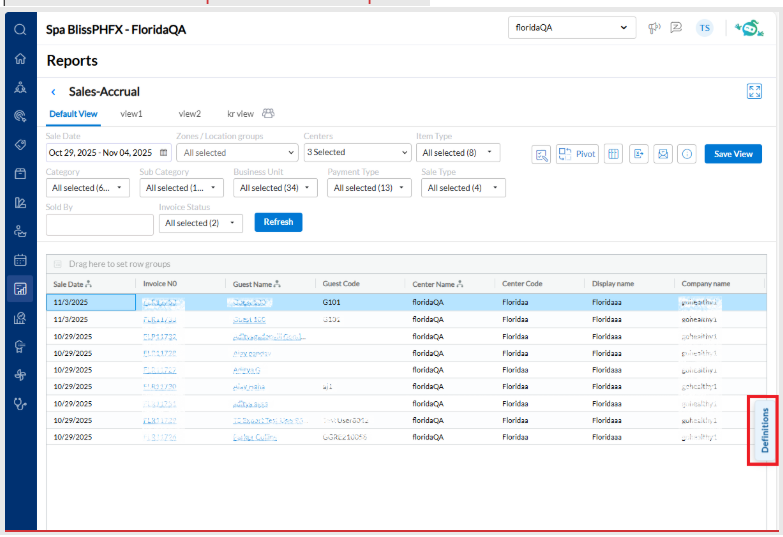
A slide-out panel opens as shown in the following image.
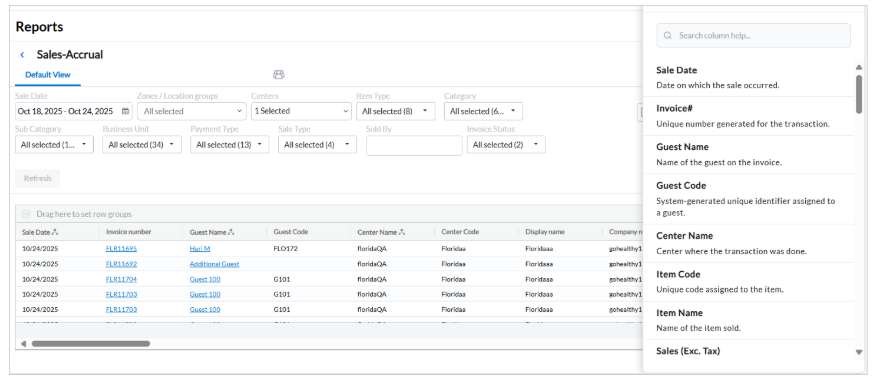 4. View definitions based on the columns visible in your selected view.
Learn More: For more information, refer to the View Report Definitions and Help Articles article.
Business Owners, Center Managers
Zenoti has updated the email scheduler in reports to improve user selection and reduce scheduling errors. You can now clearly identify users by center, and only users within your center or zone can be added to a schedule.
What’s new:
- In the Add users drop-down, each name appears along with their base center name to help distinguish between users with the same name.
- You can only view and select users from your assigned center or zone to schedule.
How-to use:
- At the organization or center level, click Reports.
- Open the report of your choice.
- Click the schedule icon.
- Select recipients by entering their names in the Add users drop-down list.
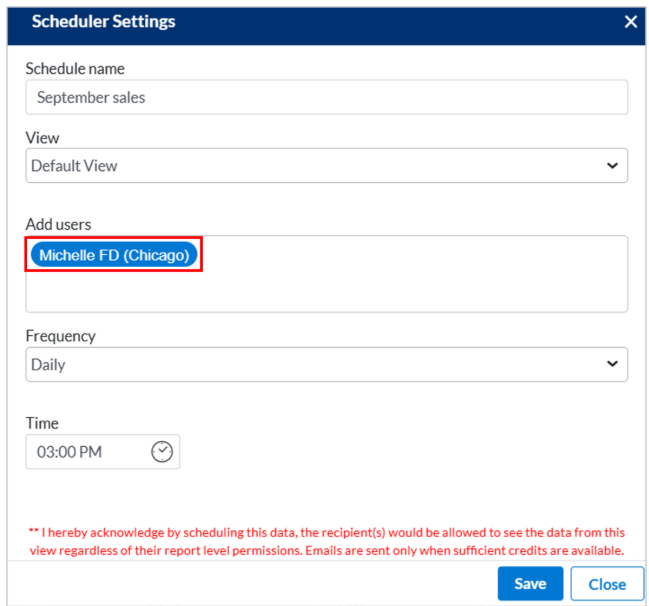
Learn More: For more information, refer to the Schedule to send a report to multiple recipients article.
Business Owners, Center Managers
The Refund Reason column is now added to the Sales Cash report to provide visibility into why a refund was issued. This helps business owners track refund activity accurately during cash-based transactions. This update aligns with the Sales Accrual report for consistency across reports.
Business scenario:
A center manager is reconciling end-of-day cash transactions and notices a refund entry. Previously, they had to cross-check multiple sources or rely on staff input to understand why the refund occurred. With the Refund Reason column now available in the Sales Cash report, the manager can immediately see the reason logged at the time of the transaction, streamlining audits, and improving accountability.
How-to use:
- At the center level, click Reports.
- Navigate to Finance > Sales.
- Click to open the Sales Cash report and view the refund reason.
Learn More: For more information, refer to the Sales cash report article.
Business Owners, Center Managers
Zenoti has updated the way refund dates are captured for class refunds. Previously, reports used the original booking date, which caused inaccuracies when analyzing refund trends and timelines. With this update, the actual refund date is now used in all reports, ensuring consistent and accurate visibility across refund activity.
Business scenario:
For example, a center manager is reviewing weekly refund activity to reconcile cash flow and assess the operational impact of class cancellations. Previously, the report showed the class booking date instead of the refund date, making it difficult to match refunds with the correct accounting period. With this update, the report now reflects the actual refund date, ensuring refunds appear in the right time frame for accurate reconciliation and reporting.
Business Owners, Center Managers
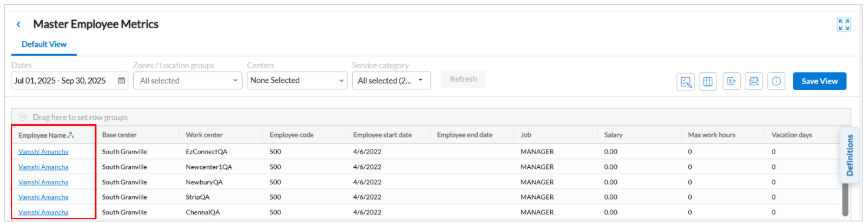
Zenoti has introduced a new Group by employee option in the Master Employee Metrics report. This enhancement enables stakeholders to view performance data for an individual employee across all centers, improving operational visibility, and supporting faster decision-making.
Business scenario:
A center manager overseeing multiple centers wants to track how a specific service provider is performing across locations. Previously, they had to generate separate reports for each center and manually compile the data.
With the new Group by Employee option in the Master Employee Metrics report, the manager can now view a consolidated summary of that employee’s performance across all centers in a single view, making it easier to identify trends, compare outcomes, and take timely action.
Learn More: For more information, refer to the Master Employee Metrics report article.
Business Owners, Center Managers
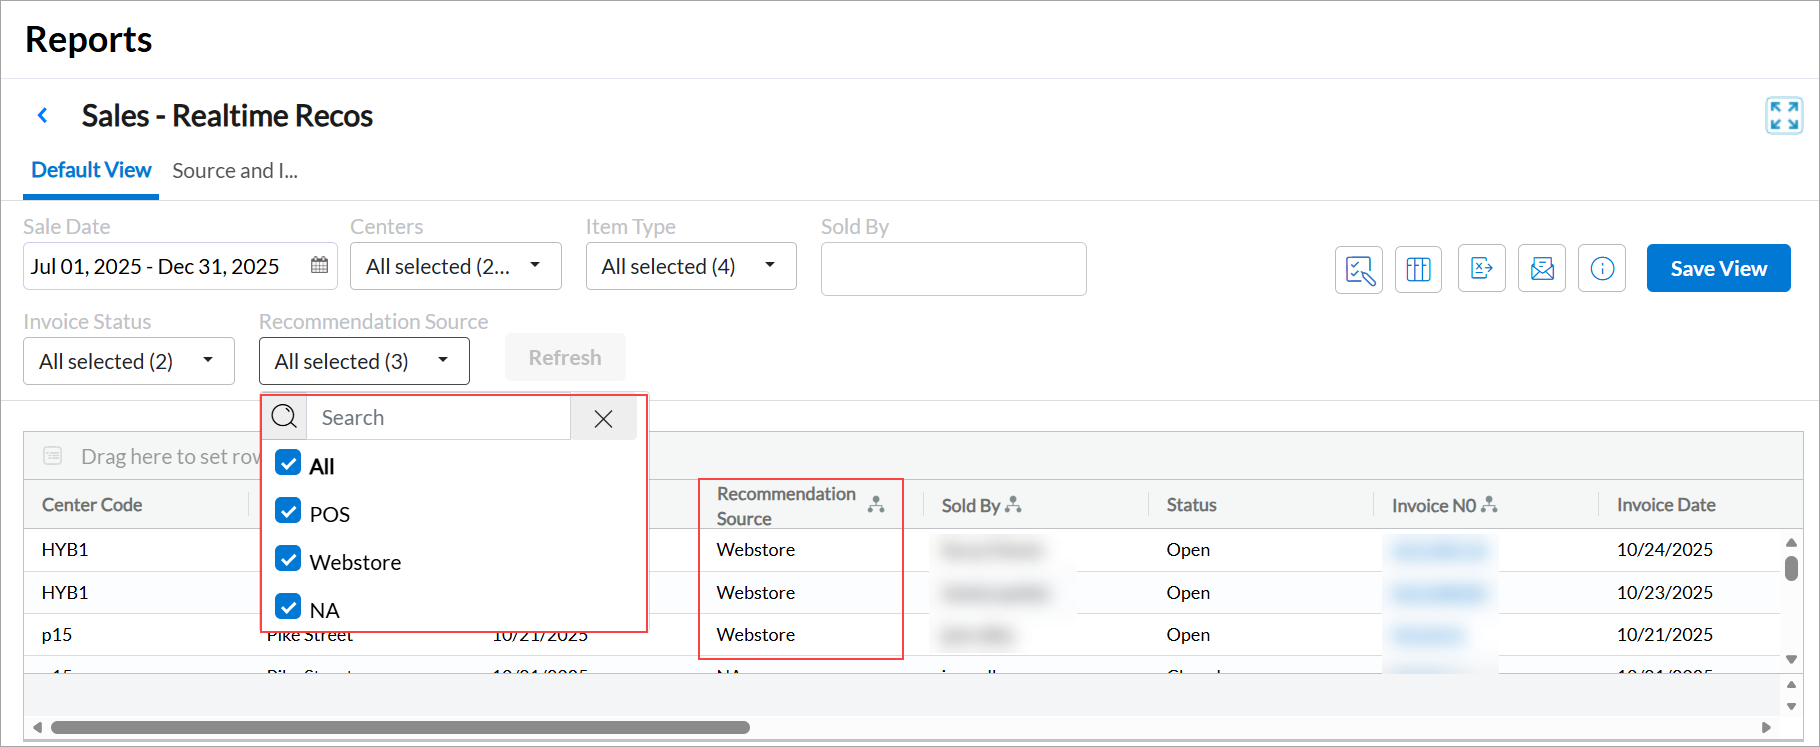
Zenoti has enhanced the Real-Time Recommendations report to support online booking data and standardize how filters and item types behave. These updates help business owners analyze recommendation performance across both POS (Point of Sale) and Webstore, with clearer item categorization.
What’s new
- Added the Recommendation Source filter with values.
- Extended support for Item type to include Services, Day/Promo Packages, Bundle Packages, and other Webstore items.
- Enabled grouping by Recommendation Source.
How-to use:
- At the organization level, click Reports.
- Navigate to Finance > Sales.
- Click Sales - Realtime Recos report.
- Use the Recommendation Source filter to select All, POS, Webstore, or NA as required. The NA category may include refunds or other transactions without a specific recommendation source.
Learn More: For more information, refer to the Sales realtime recos report article.
Integrations
Business Owners, Center Managers, Front Desk Operators
Zenoti now displays the PMS Guest tag for guest profiles created through Opera integrations. This enhancement provides visibility to back-end tagging already in place and aligns the experience across both Cloud and HTNG platforms.
The tag helps identify Opera-linked guests during booking or guest profile review. While front-desk staff can view this information by opening the guest profile, marketing teams can use the tag for segmentation and targeted communication.
What’s new
- Display the PMS Guest tag in the General tab of guest profiles created via Opera PMS
- Apply consistent tagging behavior across Cloud and HTNG integrations
- Add the Opera Guest icon to appointment blocks for quick visual identification
- Include the Opera Guest column in the Appointment V2 report showing Yes/No
- Support tag-based search and segmentation for PMS Guest tags
Business Scenario:
A front desk operator checks in a guest whose profile was created via Opera PMS. Previously, there was no way to distinguish this guest from others in Zenoti. With the PMS Guest tag available in the guest profile and the Opera Guest icon on the appointment block, the operator and marketing teams can easily identify and segment Opera-linked guests using tag-based campaigns.
Learn More: For more information, refer to the Opera on-premise article.
Business Owners, Center Managers
Zenoti now posts Webstore transactions directly to Opera PMS in real time, aligning online behavior with in-store workflows. This enhancement removes the need for manual data entry, improves financial accuracy, and streamlines hotel operations.
What’s new
- Posts gift card and retail sales from Webstore to Opera PMS automatically
- Mirrors real-time posting already supported for in-store transactions
- Reduces reconciliation delays and manual effort
- Ensures consistent sales data across Zenoti and Opera
Business Scenario:
A hotel partner using Opera PMS sells a gift card online through the Webstore. Previously, the staff had to manually post this transaction into Opera, risking delays and data mismatches. With this update, the transaction is posted instantly to Opera once the sale is completed, ensuring up-to-date financial records and reducing manual workload.
Learn More: For more information, refer to the Opera on-premise article.
Business Owners, Center Managers
Zenoti now supports the creation of purchase orders (PO) in NetSuite using Codat’s integration. This enhancement enables real-time PO creation directly from mapped data, streamlining procurement workflows and ensuring consistency with NetSuite configurations.
What’s new
- Create single-line and multi-line purchase orders with header and line-item details
- Ensure consistent PO creation without duplication
- Maintain alignment with NetSuite field requirements and validation rules
Business Scenario:
Admins previously had to manually enter purchase order data into NetSuite, increasing the risk of errors and duplicate entries. With this enhancement, purchase orders created in Zenoti are automatically pushed to NetSuite using Codat, ensuring consistency in vendor, item, and tax details, saving time and improving audit readiness.
Learn More: For more information, refer to the Set up NetSuite article.
Packages
Front Desk Operators, Administrators
This update introduces the ability to automatically unfreeze packages when payment or dispute conditions are resolved—eliminating unnecessary manual intervention. It helps businesses save time, reduce operational overhead, and restore guest access promptly without compromising control.
Business scenario:
Previously, when packages were frozen due to a failed payment or payment dispute, staff had to manually unfreeze them. This led to delays in service and increased workload for operations. With this enhancement, Zenoti can now automatically unfreeze packages under the following conditions:
Payment failure recovery: If a guest pays a previously failed scheduled payment, the system automatically unfreezes the package (if enabled).
Note: Only applicable if the package was originally frozen by the system. Packages manually frozen will not auto-unfreeze, even if payment is later made.
Dispute resolution: If all disputes on a package are either,
- withdrawn by the guest
- won by the business
then the package is automatically unfrozen (if enabled).
If any dispute is lost, the package remains frozen for manual review. This ensures quicker access restoration in safe scenarios, while still preserving manual override for exceptions.
Add-On Product
Payments
Business Owners, Center Managers
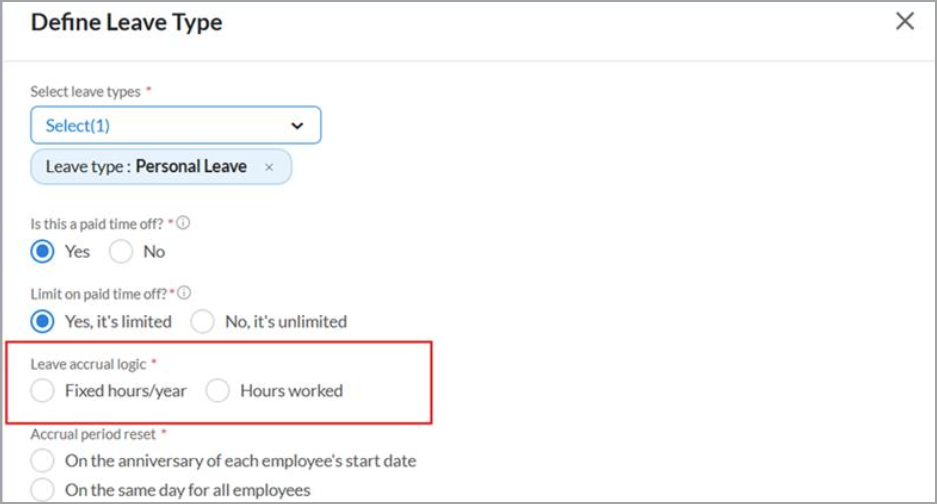
This enhancement allows businesses to define leave logic tailored to how employees work, offering upfront allotments or accruals based on hours worked or weekly tenure. It supports accurate entitlement tracking, role-based fairness, and regulatory compliance.
Business Scenario: Assign accruals to hourly staff (such as receptionists) using clock-in data, while salaried roles (such as managers) receive fixed annual balances, ensuring operational accuracy and payroll alignment.
Key Benefits
- Ensure compliance with role-appropriate leave logic
- Track leave costs accurately across locations
- Unified leave balance visibility for employees working across multiple locations
What’s New
- Upfront leave per week/year
- Accruals based on hours worked or weekly tenure
- Auto-proration for mid-period joins/exits
Note: Available only to businesses using Zenoti Integrated Payroll (ZIP), which is currently in closed beta. To join the closed beta, contact Zenoti Support.
Online Booking
Business Owners, Administrators
Guests can now stay logged in on the same device and browser for up to 3 months with the new Extended Login Session feature. This enhancement removes the need to repeatedly enter credentials on return visits, delivering a faster and smoother booking experience.
Returning guests are automatically signed in when they revisit the Webstore — unless they manually log out or the session expires after 90 days.
Business Scenario
Imagine a guest who frequently books spa appointments every few weeks. With Extended Login Sessions, the guest remains securely logged in when they return to the webstore. They can quickly browse services, book appointments, or purchase memberships without re-entering credentials. At checkout, re-authentication is prompted only for sensitive actions like saved card payments, keeping the experience both convenient and secure.
Note: This feature is available by default.
How to use:
- At the organization level, click Configuration.
- Navigate to Online booking > Online booking settings > Webstore > Guest profile and signup.
- Turn on the Enable extended session for guest toggle.
- Set the expiry time for guest’s extended session.
- Click Publish to save your changes.
Learn more: For more information, refer to the Log in to Webstore and CMA (Customer Mobile App) article.
| N/A | Glossary |