
Release notes - March 31, 2026
On this page
- Announcements
- Payments
- New Features
- Memberships
- Enhancements
- Appointments
- Employee
- Queue
- Kiosk
- Guest Profile
- MyZen
- Gift Cards
- Integrations
- Fitness
- AI Scribe
- Digital Forms
- Online Booking
- HyperConnect
This release introduces the Xendit payment integration for the Philippines and the Human Interest 401(k) integration, a new Membership Forms Status report, and a broad set of enhancements across Appointments, Employee, Queue, Kiosk, Guest Profile, MyZen, Gift Cards, Integrations, Fitness, AI Scribe, Digital Forms, Online Booking, and HyperConnect.
Announcements
Payments
Automatic Update | Business Owner/Center Manager
Zenoti Payments now available through Xendit for the Philippines
Zenoti Payments expands to the Philippines through an integration with Xendit, enabling businesses to accept payments directly within their existing workflows.
Business Owner/Center Manager
Manage retirement savings with the Human Interest 401(k) integration
Zenoti now integrates with Human Interest as the retirement savings partner, replacing the previous Accrue 401(k) component. Human Interest is a full-service 401(k) provider that syncs directly with payroll to automate contribution processing, employee onboarding, and compliance management.
This integration reduces manual effort for business owners and ensures employees have access to a modern, intuitive retirement savings experience. With this update, the Retirement Savings section in Zenoti reflects the Human Interest platform, providing a simplified setup and ongoing management experience.
New Features
Memberships
Business Owner/Center Manager
Introducing the Membership Forms Status report
The Membership Forms Status report provides a comprehensive view of all membership-related form activity, including forms submitted or skipped by guests and staff across key lifecycle events such as sign-up, freeze, cancellation, upgrade or downgrade, transfer, add-ons, renewals, and locker actions.
This report helps leadership monitor compliance, identify locations with low completion rates, uncover operational gaps, and track usage trends for forms. It also supports follow-up by enabling users to notify members with incomplete forms, individually or in bulk, directly from the report.
How to use:
- At the organization or center level, click the Reports icon.
- On the Reports page, search for and select the Membership Forms Status report.
- Review the data in the columns. The Submit Status column indicates form completion status.
- To notify members about pending form submissions, select the required records and click Notify.
Note: The Notify button is enabled only for records with a Submit Status of Not Submitted. Based on the membership activity, members receive notifications to submit related forms.
Enhancements
Appointments
Admin | Business Owner/Center Manager
Customize the right pane layout in the redesigned Appointment Book
Admins and owners can now configure the display order of sections in the right pane of the redesigned Appointment Book at the center level. This enhancement eliminates guesswork for front-desk operators by surfacing the most relevant actions first, and saves large organizations significant setup time.
How to use:
- At the center level, navigate to the Appointment Book.
- Click More and select Reorder right pane.
- Drag sections into your preferred order.
- Click Save to apply the configuration for that center.
Note: This setting is available to all users who have permission to edit the redesigned Appointment Book card settings at the center level. Centers that have not configured a custom order continue to use the system default right-pane layout.
Employee
Business Owner/Center Manager
Group by Job and view footer totals in the Employee KPI Report
The Employee KPI Report now supports grouping employees by Job and displays footer totals for all numeric and ratio-based metrics. Ratio metrics such as Average Invoice Value or Productivity % are calculated as weighted averages using base values across the group, ensuring accurate aggregations for performance analysis across roles.
For example, a salon comparing stylist performance by role may have two stylists each showing an Average Invoice Value of $100 but with different invoice counts (10 and 20). When grouped by Job, the report calculates the weighted average correctly as $100 — that is, (1000 + 2000) / (10 + 20) — rather than averaging the two individual values. If a ratio metric has no eligible records, the report displays "—" instead of a value.
How to use:
- Navigate to the Employee KPI Report from the Reports section in Zenoti.
- Drag the Job column header to the Drag here to set row groups area above the report table. The report groups employees by job, displaying subtotals per group and aggregated footer totals.
- Use the Sort option on the Employee Name column to sort A to Z or Z to A.
Learn more: For more information, refer to the Employee KPI Report article.
Business Owner/Center Manager
View revenue metrics in the Employee KPI Report
The Employee KPI Report currently displays sales amounts, which include shop costs that businesses typically do not expose to employees. With the new By Close Date filter option, businesses can now load the Employee KPI Report using invoice close dates to display revenue columns (Service Revenue, Product Revenue, Membership Revenue, Package Revenue, and Free Service Revenue) calculated consistently with the Employee Summary Report and honoring your organization's deduction settings.
For example, a spa prices a facial at $100 with a $20 shop cost, so the employee's commission is calculated on $80. Previously, the KPI Report showed the full $100 sales amount, causing confusion and escalations. By switching to the close date option, the report now shows $80 in Service Revenue, matching the Employee Summary and giving employees an accurate view of their performance.
How to use:
- Navigate to the Employee KPI Report from the Reports section in Zenoti.
- In the filters panel, locate the Load data by option and select Close Date.
- Select your desired date range. The report loads only closed invoices with a close date within the selected range.
- The report now displays revenue columns: Service Revenue, Free Service Revenue, Product Revenue, Membership Revenue, and Package Revenue.
- To return to the existing sales view, select Sale Date in the Load data by filter.
Learn more: For more information, refer to the Employee KPI Report article.
Queue
Admin | Front Desk Operator/Service Provider
Faster and more accessible PIN entry experience
The PIN entry pop-up is redesigned to eliminate switching between keyboard and mouse. Staff can now search, select, and log in entirely from the keyboard, reducing friction on the Appointment Book screen.
How to use:
- Navigate to the Appointment Book and enter PIN mode. The PIN entry pop-up opens.
- Select a user by clicking a quick-select button (which shows the last four clocked-in staff, indicated by a green dot), typing a partial name in the search field, or using the Up/Down arrow keys to navigate the filtered list.
- Press Enter to confirm your selection. Focus moves to the PIN field automatically.
- Enter your four- to six-digit PIN and press Enter to log in.
Admin | Front Desk Operator/Service Provider
Identify walk-ins and call-aheads in Queue reports
Zenoti now differentiates between walk-in and call-ahead appointments in reports and APIs for organizations with Queue enabled. A new Queue appointment type column appears in the Appointment Details, Wait Time Deviation, and Performance by Hour reports, showing either Pick a time (call-ahead) or Earliest available (walk-in) based on your configured label.
The Wait Time Deviation report also now shows all appointments by default. Use the new Type filter to switch between All appointments and Queue appointments.
How to use:
- Navigate to any of the reports listed above.
- Look for the Queue appointment type column to identify whether an appointment is a call-ahead or walk-in.
- In the Wait Time Deviation report, use the Type filter to narrow results as needed.
Learn more: For more information, refer to the Appointments report (v2) and Performance by Hour report (v2) articles.
Kiosk
Front Desk Operator/Service Provider
Kiosk updates for pricing display and variant services
Guests using the Kiosk can now see accurate pricing before selecting a therapist, and can browse and book variant services directly from the Kiosk. For example, a Haircut service may offer Short Haircut or Long Haircut as variants. Guests can book only one variant per appointment.
How to use:
- At the center level, click Configuration.
- Navigate to Kiosk.
- Turn on the Display price as a range toggle to show the price range across available therapists for a service before a therapist is selected.
- Turn on the Display price with a label toggle to show a prefix before the service price.
- In the Enter a prefix for Service Price field, enter a custom prefix or retain the default Starting.
Learn more: For more information, refer to the Guest check-in on New Kiosk article.
Guest Profile
Front Desk Operator/Service Provider
Manage guest card relationships from the Profile tab
Guest card relationships can now be managed directly from the Profile tab in the guest profile. Previously, this was only accessible from the Payments tab. This change gives front desk operators a more intuitive location to view and manage who a guest shares their card with, without leaving the profile context. Saved cards, Add Card, and ACH remain in the Payments tab — only relationship management has moved.
How to use:
- Open the guest record and navigate to the Profile tab.
- Click the card icon. A list of people the guest shares the card with appears.
- To discontinue card sharing with a related guest, turn off the Share card toggle next to the guest's name.
- To delete a related guest, click the Delete icon next to the guest's name.
- To add a new guest relation, click Add new, enter the receiving guest's name, and select the relationship type.
- To share the card with the newly added guest, turn on the Share card toggle.
- Click Save.
Note: To update an existing guest relationship, delete the relation and re-add it with the new details.
Learn more: For more information, refer to the Redesigned Guest Profile article.
MyZen
Admin | Business Owner/Center Manager
Track more Employee KPIs in MyZen
Six new performance metrics from the Employee KPI core report are now available in MyZen — including My Rebooks, My Rebook Rate, New Service Guests, % Service Invoices with Product, and two configurable custom columns. Admins control which metrics are visible to employees, and all new metrics appear consistently across performance sections and leaderboards. This gives KPI-driven businesses a single, trusted source for employee performance data, with zero variance between the core report and MyZen.
Note: All new metrics are disabled by default.
How to use:
- At the organization level, navigate to Configuration > Employee Mobile Apps > MyZen > Employee Performance.
- Click Configure Employee Metrics.
- Locate the new metrics and turn on the ones relevant to your business: My Rebooks ("Rebook with Same Provider" on web), My Rebook Rate ("% Rebook with Same Provider" on web), New Service Guests, % Service Invoices with Product, and the two custom columns.
- Click Save.
The enabled metrics appear in the Performance section, Trends, and Leaderboards for your employees.
Learn more: For more information, refer to the Configure performance metrics on MyZen article.
Gift Cards
Admin | Business Owner/Center Manager
Send tailored notifications with separate Gift Card templates
Businesses can now create distinct notification templates for amount-based and service-based gift cards. When enabled, a single pair of templates replaces the three stream-specific templates (Webstore email, POS email, and POS print PDF), applying consistently across all purchase channels.
Guests receive contextually relevant messaging — for example, "Enjoy your facial!" for a service gift card or "Spend your $100 balance" for an amount-based card — strengthening brand communication and removing the need for conditional placeholder workarounds.
How to use:
- At the organization level, search for and turn on the Set Up Separate eGift Templates for Amount and Service Gift Cards toggle.
- Select one of the following options: Start with default templates (use pre-built templates for each gift card type) or Copy from existing templates (populate the new templates with your current Webstore gift card email content as a starting point).
- Edit the Amount-Based Gift Card and Service-Based Gift Card templates as needed from Notifications.
- Click Save.
Note: Turning the toggle off restores your previous stream-specific templates with their last-saved content. Your type-specific template customizations are preserved and reactivated if you re-enable the setting. SMS notifications are not in scope for this release.
Learn more: For more information, refer to the Organization level gift card settings article.
Integrations
Admin | Business Owner/Center Manager
Track orders from third-party marketplaces in Zenoti
Orders from third-party marketplaces connected through Shopify (such as Ulta) often arrive without critical customer details like email, making it impossible to match them to a guest profile in Zenoti. With Marketplace Order Mapping, you can assign these orders to a dedicated guest profile, created in advance, based on the marketplace source — keeping your sales reporting and customer attribution accurate.
For example, a salon chain that sells products through a third-party marketplace via Shopify can create a mapping to assign all orders from that source to a dedicated guest profile, keeping reporting clean.
How to use:
- Navigate to Configuration > Integrations > Integration Settings > ECommerce.
- Expand Configuration and turn on the Enable Marketplace Order Mapping toggle. Click Save.
- Expand the Marketplace Order Mapping accordion and click Add Mapping.
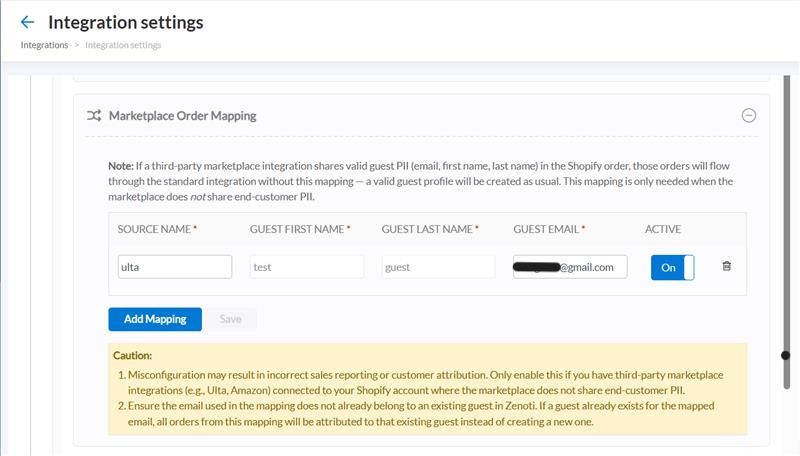
- Enter Source Name, First Name, Last Name, and Email, and turn the Active toggle on.
- Click Save.
Note: Mappings can be configured independently at both the organization and center levels. The default center inherits its configuration from the organization.
Fitness
Admin | Front Desk Operator/Service Provider
Access key fitness data from the redesigned guest profile
Zenoti has extended the redesigned guest profile to support fitness businesses with dedicated Visits, Guest Pass, Payments, and Statements tabs. Staff can now access visit history, guest pass details, payment records, and House Account billing information directly from the guest profile. This eliminates the need to switch between separate screens, giving front desk teams a single view for day-to-day fitness operations.
How to use:
- At the organization or center level, navigate to Configuration > Appointments > Interface.
- Enable the New guest profile toggle.
- Navigate to the Guests tab and select a guest.
- Select the Visits, Guest Pass, Payments, or Statements tab to view the corresponding data.
Learn more: For more information, refer to the Redesigned Guest Profile article.
Admin | Front Desk Operator/Service Provider
Alert for unsigned membership forms on the Visits page
Zenoti now displays an alert on the Visits page when a member checks in without a signed membership form. Front desk staff can identify unsigned forms at the point of check-in and collect the signature before the member enters the facility. This alert also works for add-on members in family memberships.
Note: When enabled, the front desk operator receives a high-severity message in red on the Visits page with the reminder text "Membership form not signed."
How to use:
- At the organization or center level, navigate to Configuration > Fitness > Visits page alerts.
- Locate and enable the Membership form not signed alert.
- Click Save.
Learn more: For more information, refer to the Alerts for unsigned membership forms article.
AI Scribe
Admin
Simplified setup process for AI Scribe
Setting up AI Scribe previously required navigating multiple configuration areas, making initial deployment time-consuming for administrators. With this enhancement, organizations can now configure AI Scribe through a guided, step-by-step process.
The new setup wizard walks you through managing user licenses, configuring role permissions, assigning charting layouts to services (done automatically with AI), and preparing forms for AI filling (done automatically with AI), significantly reducing manual setup effort.
How to use:
To start setting up AI Scribe, at the organization level, navigate to Configuration > AI Scribe.
Learn more: For more information, refer to the Set Up and Manage AI Scribe article.
Digital Forms
Admin | Front Desk Operator/Service Provider
Guest unique identifier now read-only on forms
To maintain data integrity and ensure consistency across all touchpoints such as Webstore, forms, and kiosks, the field configured as the guest unique identifier (mobile number or email address) is now non-editable on forms.
This aligns the behavior with other employee and guest-facing channels where the unique identifier is already protected. Any updates to these guest details can always be made from the guest profile.
Online Booking
Guests | Admin
Family membership cancellation on Webstore and CMA
Family membership holders can now freeze or cancel individual members within their membership, rather than applying these actions to the entire group at once. This update brings greater flexibility to how families manage their memberships through the Webstore.
For example, a primary member with four add-on members (one minor, two adults, one senior) can freeze only their own membership while the rest of the family continues uninterrupted. Similarly, a primary member can cancel only select add-on memberships without affecting the rest of the family plan.
How to use (freeze):
- Log in to Webstore v2 and navigate to your membership.
- Click Freeze. A prompt appears asking you to select which members to freeze.
- Select the members you want to freeze.
- Depending on your center's configuration, choose either an immediate or scheduled freeze start date.
- Select the freeze end date from the available options.
- Review the freeze fee displayed for each selected member. Fees are calculated based on the pricing template (age-based or relationship-based).
- If the primary member is being frozen, select a new primary member from the remaining eligible add-on members.
- Provide a freeze reason and complete any required freeze forms.
- Click Continue to confirm.
How to use (cancel):
- Log in to the Webstore and navigate to your membership.
- Initiate cancellation. A prompt appears asking you to select which members to cancel.
- Select the members you want to cancel. This can include the primary member, select add-on members, or all members.
- Review and confirm the cancellation start date and end date for each selected member. You can apply the same dates across multiple members if preferred.
- Review the buy-out fee (if applicable) for each member.
- If a buy-out fee applies, select a payment method.
- If the primary member is cancelling, select a new primary member from the remaining add-on members.
- Complete any required cancellation forms before final submission.
Note: The default freeze type for family memberships is always Freeze Benefits. Freeze fees are not collected through the Webstore. Freeze and cancellation rules (including allowed frequency, maximum duration, and reasons) are configured at the organization and center level by your administrator. Only age-based or relationship-based pricing templates are supported, not both simultaneously.
HyperConnect
Business Owner/Center Manager
Organization-level reviews dashboard in Analytics
Zenoti has expanded the Reviews tab in Analytics to include an organization-level dashboard, allowing businesses to view and respond to reviews across all centers from a single screen. A new report surfaces key review metrics — including Reviews received, Reviews replied, and Average rating — with the ability to filter results by source and date range.
For example, a spa group with eight locations that previously had to log in to each center individually to monitor guest reviews can now open the Reviews tab at the organization level and see aggregated metrics across every connected center.
How to use:
- Navigate to Analytics at the organization level.
- Select the Reviews tab.
- Select a date range: MTD (Month-to-Date), QTD (Quarter-to-Date), or a custom range.
- Use the Source filter to narrow results by Google, Facebook, or Zenoti.
Learn more: For more information, refer to the Manage reviews and replies article.